Thursday, September 11, 2014

DIY Lego Table

Here's one for the BOYS!


My boys are currently Lego crazy! (Well, actually, so is my girl.)  The little bricks are taking over our house!  But, despite the occasional middle of the night lego land minds, I will gladly put up with the mess for the hours of creative, screen-free entertainment they provide!


So, when I saw this little white table at a garage sale for $5, I immediately thought, "Lego Table!"


The table itself is from Ikea - and currently listed for $39.99.  A garage sale steal, I think.


The most expensive part of the supplies were the lego plates.  Turns out that there is no cheap way to find them.  They seem to be the same on eBay, amazon and completely missing from garage sales and Craigslists.  Popular. All in all $25 for lego plates is a small price to pay for hours of entertainment (and a little more organization).


I bought one 15 x 15 grey plate and two 10 x 10 blue plates to make up the "water" side of the table.  On the advice of the girl at the lego store I just cute one 10 x 10 plate in half with scissors.  Turns out it's really easy.


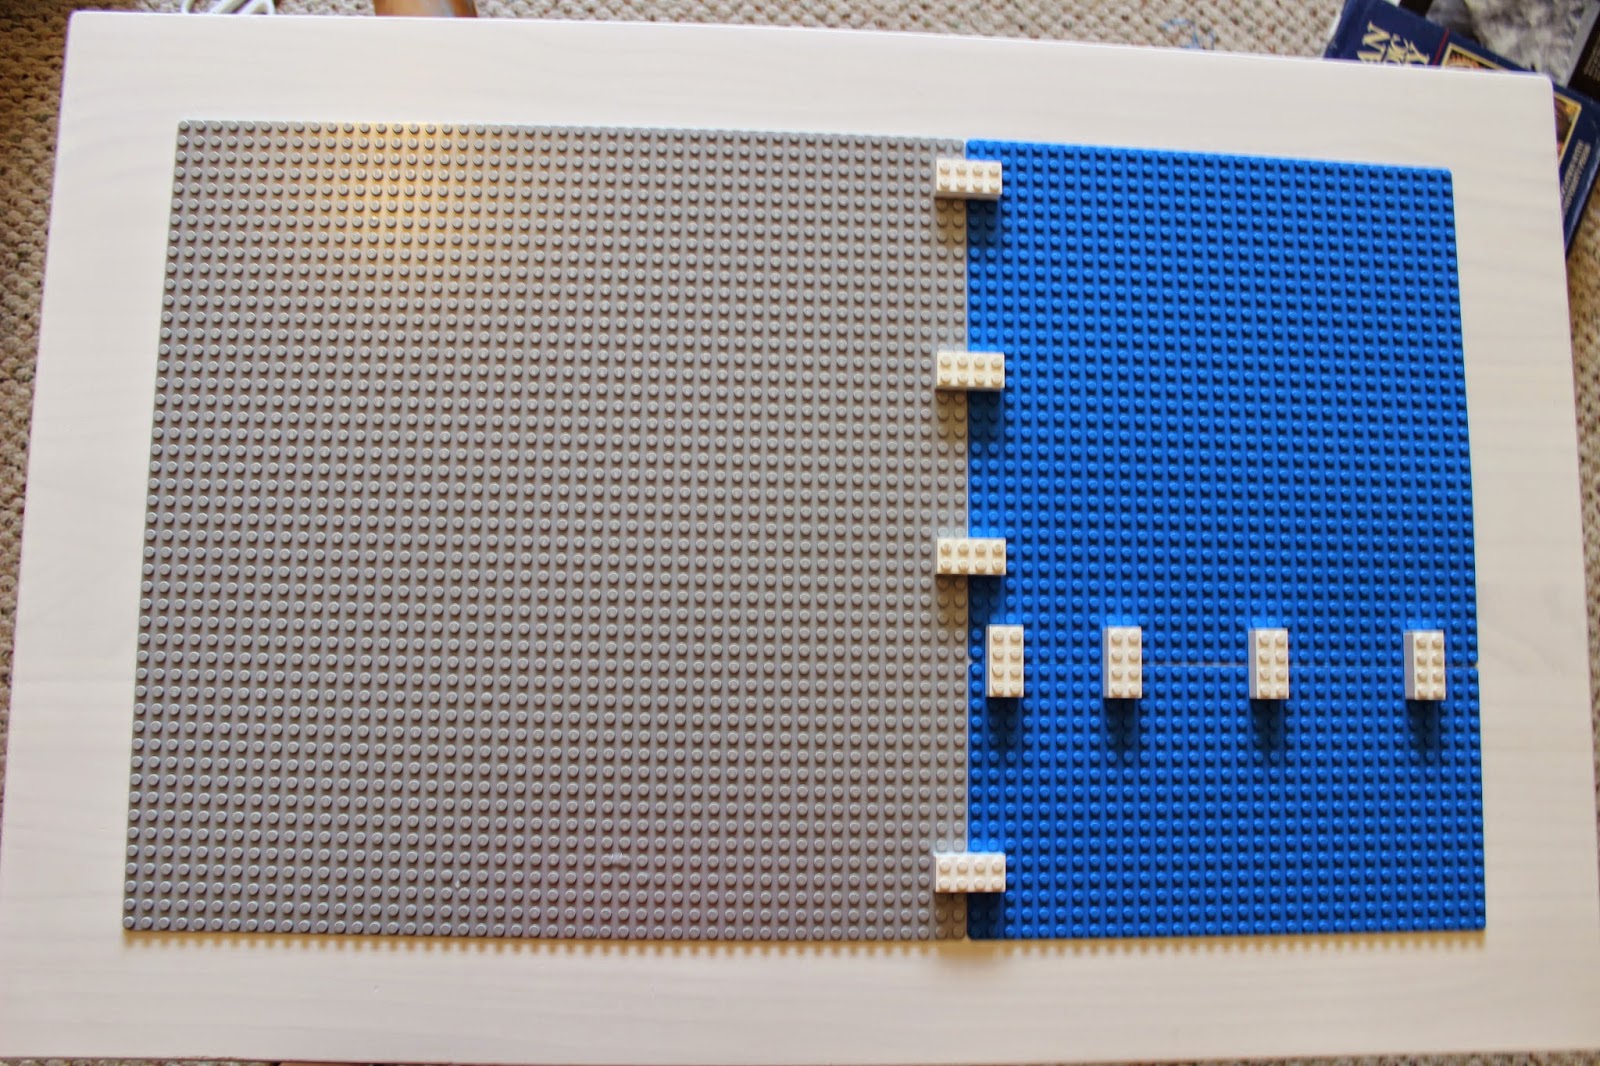
I left a lot of allowance while cutting and used the white bricks you see above to test and make sure the edge was trimmed and fit together properly.  I also used regular sand paper to smooth out the edges and corners.

Using the legos to hold the plates together is also an important trick to make sure all the plates line up and hold together while glueing - DO NOT FORGET THIS STEP!

To get started with the gluing, I thoroughly cleaned the table to ensure a good surface for glue adherence.


I used Gorilla Glue to hold my plates down mainly because we already had some in the garage, but you could probably construction adhesive from the hardware store or any number of other really strong glue products. I started by wetting the area in which I was planning to apply the glue per the instructions.


I had heard that Gorilla Glue really spread out as it dries and if you are not careful you will get a lot of over drip, so I started my glue pattern about 2 inches from the edge of the plates.  This was actually a little too far from the edge as they ended having gaps and being really easy to pull off.  So, I ended up re-gluing them with the glue only about 3/4 of an inch from the edge and putting larger dollops of glue in the corners and middle.


The glue bottle says to clamp down the objects, but unfortunately the lip of the table wouldn't allow for clamping so I had to improvise...


I let this all dry for a couple hours and now it feels like there's no way those plates are going anywhere!

Finally, I wanted to give the kids somewhere to put the legos that they would be working with to build things.


I came up with the idea of a little side container and found this little drawer organizer that's about 2 inches deep with a lip around the top edge for about $2 at Target.  The lip is really important because it allows the organizer to rest on the table so there is not so much pressure on the screws (which I think would just break the whole thing really quickly).


I measured out and found the center of the table and the container and drilled a small pilot hole.  Then I again laid down a bead of glue to give it extra strength and support.  Next, using a 3/4 inch washer to give the screwhead extra support, I screwed in the middle screw.


Last, I measured and drilled two more pilot holes equidistant from the center and screwed the screws with washers tightly in as well.


This all took about an hour over the course of an evening and the next morning and has already provided hours of entertainment.


I don't really think it has done anything to control the lego mess, but oh well, still well worth the effort!


Monday, September 1, 2014

Baby Girl Bunting

I don't know what's in the water, but I have no less than 4 friends or relatives expecting baby girls in August or September!  I am absolutely thrilled for each of them and decided to make something festive to celebrate their little bundles.


I always love bunting (or flags or whatever you call it) for parties.  It's an easy decoration and adds a feeling of classic fun.  I also love the thought of making a decoration that can be reused for so many other things!  And - turns out with this project I got to reuse a lot of my own fabric stash making it extra green and planet friendly.

Materials
1/4 yard each of 5-6 difference patterns of material
10-20 feet jute garden twine
sewing machine and thread


First thing I did was draw a diamond pattern that was double the size I wanted the flags to turn out.  Then I doubled over my fabric, pinned it and cut out the diamonds with pinking sheers for some extra fun on the sides (plus, as it turns out, cutting with pinking sheers hides a multitude of cutting sins like not completely straight cuts...).  


To conserve and use as much material as possible, I also folded my pattern in half and cut triangles on the fold between the diamonds.  Every little bit counts!


After I had my stack of coordinating diamonds, (yes, all of these were scraps from my stash - I couldn't believe I had so many perfect matches!!) I went to the HOME DEPOT.  Yes - the hardware store.....


That was where I picked up my $4 roll of jute garden twine!  I think it has something crazy like 300 yards worth.   You better believe I will use this stuff again - very rustic and neutral.


Finally I folded the diamonds over the twine to make a jute sandwich and sewed them together with a 1/4 inch allowance.  I also left a really long amount of twine at each end so that there is plenty of flexibility to tie them up later.


I just eyeballed the length and kept sewing until the banner seemed "long enough."


 My little lady here really likes them!  I think she wants me to make one for her too.  But for now, these little banners are waiting for their newly hatched little owners!


Monday, August 25, 2014

Last Day of School Bags

So, I realize I'm a little behind the ball on teacher gifts, but these little bags turned out so cute back in June, that I just had to share even if it is August.  In fact, I have found that this is exactly what vacation is great for - catching up on blog posts I should have posted months ago!


These were super simple and in expensive!

Supplies

2 cute placemats (or one dish towel)
3 yards strapping material
about 7 x 7 inch scrap material for inner pocket
your sewing mating and thread

For the big ones I used two placemats each from Target! They were about $4 each.  The smaller one (below) is just one dish towel which was $4.


In addition to the kitchenware, I used some fun, colorful strapping I found at Pacific Fabrics.   I used 3 yards of each color and I think it was about $2.50 per yard.


Now least you think I came up with this all on my own, I generally followed this Placemat Tote Bag tutorial from Dana, at Made.  I combined the placemat bag tutorial with the pocket tote tutorial and voila!


A Placemat Tote with a pocket inside.


First, I sewed the strapping on the outside of each side leaving a 24in loop on top for the handles.  I placed the straps about 4in in from the side of the bag.


Next, I cut a rectangle of material, folded in the edges 1/4 inch twice and ironed.  I sewed the top edged of the pocket material, then pinned it to the wrong side of the bag and sewed around the two sides and bottom edge.


 Finally, I placed the two placemat sides wrong side together and sew around the three edges as close as I could to the edge.  I was careful where the straps met up at the bottom and reinforced the top corners to give it some extra strength - hopefully for some towels and sunscreen for a fun summer trip!


Happy Summer!


Friday, June 13, 2014

Sewing for ME! A Washi Dress

Spring crept up and hit me with a jam-packed schedule of activities.  In the midst of it, I vowed to get back to sewing and to sew some things for ME for once.  

First, I decided to tackle the Washi Dress by Made by Rae once again.  The first time didn't go so well... see last summer's Washi.  But thanks to almost a year more of sewing experience, this one went much better.


I never imagined I could make a fitted dress that would actually look good on me, but I had an occasion, not much money and a pattern, so I figured I would go for it!  The material just says "Savannah" on the selvage.   I found it on the bargain table at Pacific Fabrics and it immediately caught my eye (as I was running past to catch my two year old who was crawling under the bargain tables and hiding in boxes.


I loved the cute springy colors and vertical stripes.  I mean who doesn't love a slimming vertical stripe!

I was determined to "Make it work!" this time and not waste my bargain fabric find.

Turns out that when you follow the directions on the pattern and don't try to change things, patterns actually fit!  Go figure!

Actually, I did make a couple minor changes, but I was much more confident this time that I wasn't screwing the whole thing up.  First, I moved the bust darts down an inch and a half.  After three kids...  well, you know.


I think they turned out pretty flattering and well fitting.

Second, I added a couple more rows of shirring in the back to nip in the waist a bit more.  This also turned out just fine and added a bit more definition in that area (a little less maternity dress-like).


 All-in-all, I am pretty happy with this dress and plan to make more soon!  It's so comfy, yet the changes I made allow for some definition.  Perfect for that put together, yet comfortable summer look!


Friday, February 7, 2014

Knit Infinity Scarves of Joy

SO what do you do with 5 yards of kelly green and navy knit material.... 


Make 6 matching infinity scarves, of course! 


This was a super fun and fast project that I worked on 2 weeks ago for my besties who I met in Florida :) 


You see, we all went to this Catholic school in Indiana with a good football team and amazing school spirit and none of us can ever seem to have too much school swag.  And isn't school swag even that much better when it's "on trend" and matches some of the coolest people you know?


These infinity scarves are super easy as they are just tubes of material.  I cut 6 pieces that were 62 inches x 18 inches.  This is just a 1/2 yard of knit really, but in my case, I wanted the stripe pattern to go the opposite direction, so I cut them vertically.


Then I just folded in half, pinned and sewed the long edge together.  I used a simple straight stitch because I knew these wouldn't be stretching too much and it was so much faster than anything else.


To attach the ends together, I just pulled one end of the tube up inside the other and pinned the two sides together right sides together.  I sew around the circle except for the last two inches, then pulled everything through the little hole so the scarf was right side out and hand-stitched the last remaining hole. 


These are super fun to make in all sorts of knits and I love a good scarf to keep my neck warm I the winter!