So, I finally broke down and got my boys handheld electronic game players. Boo, I know. But, for Spring Break we drove to my parents house - a 12 hour drive. And by "we" I mean me... and 3 kids... ages 5 and under. Unfortunately, my husband has this boring thing called work he has to stay home for.
Anyway, that means I needed to strap them in and encourage some kind of quiet activity that would hold the whining at bey. At least the players are the educational kind...

So now they need cases, right?!
Step 1 - Measure
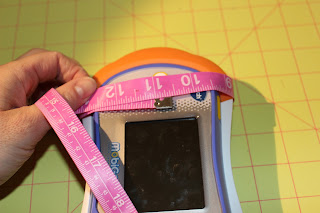
I started by measuring the circumference of the player. Be sure not to just measure across because some of these are quite thick and you may end up with an ill fitting case otherwise.
 In my case, my dimensions were 17 inches lengthwise and 10.5 inches width wise.
Step 2 - Calculate the Dimensions and Cut
Width wise I divided by 2 (10.5/2 = 5.25) and added 2 inches to compensate for the thickness of the batting and seam allowances.
Lengthwise, I added 4.75 inches. 2 inches for padding and seams and 2.75 inches to fold over the top as a closure.
Final cut measurements - 21.75 x 7.25
The batting I wanted a little smaller than the width at 5 inches wide and a little shorter at 21 inches. This way there is plenty of padding, but also room to stuff the padding in the material once it is sewn.
I also wanted the case to have a little pocket to hold ear buds or cartridges so I cut an additional rectangle that ended up being 3 5/8 x 8 1/2.
Finally, there is the strap, which I figured at 14 inches by 2 inches wide and some fusible interfacing at 1 inch by 14 inches.

Step 3 - Sew the Pocket and Strap
Fold your pocket rectangle lengthwise with Right Sides Together (RST). Sew with a 1/4 inch seam allowance leaving about an inch and a half open at the bottom for turning. In the picture to the right I stopped sewing at each of the two pins on the bottom.

You'll also notice some elastic in there. Yes, I attempted an elasticized pocket. Turns out that 1) it made it much more time consuming and 2) is didn't really do much as far as function. I would recommend just forgetting it!
Clip the corners and turn your pocket right sides out through your hole. Then fold your raw edges in and topstitch about an 1/8 of an inch from the edge like below.

Yay! You finished the pocket!
Now, for the strap!
Here, I took my 2 inch wide strip of material and ironed both edges into the center until the met.

Then I ironed the strip of interfacing in the middle, folded the edges back in around it and ironed the whole thing in half.
Don't you just love my groovy ironing board cover? Some day I'll get around to replacing that....
Don't you just love my groovy ironing board cover? Some day I'll get around to replacing that....
Finally, sew the strap together by topstitching 1/8 of an inch or so from the edge.
Step 4 - Sew the Main Case Body

First, fold your long rectangles in half RST and round the corners of one end. This will give you a nice rounded flap detail.
Next, pin the long rectangles together RST like below. Sew up one edge, around the curve and down the other side, leaving the bottom open. Clip the curve and turn right side out.

Now, take your batting and cut a similarly shaped curve on one end. Stuff it in to the open end of your case body. Make sure you get it all the way in and centered somewhat.
Next turn the raw edges in...
and sew the raw ends together about 1/8 inch from the edge.
Now you are ready to sew your case accessories on!
Step 5 - Sew on Accessories
Fold your main case body in half lengthwise so it looks like a case. The rounded flap should be able to fold over the straight end and hang down some so that it will close when you add your Velcro. Now take your square pocket and place it about 1 1/2 - 2 inches down from the straight edge with your boarded facing the straight edge. I like my closure flap to hang over the pocket a little to make it harder for stuff to fall out.
When you get the pocket where you want it, pin it to the case body.
Start sewing down one side from the top and around the rest of the pocket about 1/8th of an inch from the edge. Try and sew directly over the stitches that closed the pocket and you will hardly be able to tell they are there!
Now, take your Velcro and pin it place it above the pocket. It can be any shape or size as it fits in the space. Sew around the Velcro and then sew a little X in the middle of the stuff - this really helps reinforce it as it is continually pulled on.

Next, turn your case inside out and pin up both sides. There should be enough material so that you can sew a 3/8th inch seam with out sewing the batting.
Then, take your strap, fold it over...
and place it between the edges about an inch down from the top with the main strap loop inside the right side of the case.

Then sew up the sides of the case.

Finally, pin and sew your Velcro on the top flap of your case...
And fill and enjoy!


No comments:
Post a Comment